ReadtheDocs
Read the Docs是一个在线文档托管服务, 你可以从各种版本控制系统中导入文档,如果你使用webhooks, 那么每次提交代码后可以自动构建并上传至readthedocs网站,非常方便。
本文使用Sphinx + GitHub + ReadtheDocs 作为文档写作工具,用 Sphinx 生成文档,GitHub 托管文档,再导入到 ReadtheDocs。
搭建环境步骤
需要的工具
github账号
python环境
安装Sphinx
# 创建工程目录
$ mkdir -p read-the-docs && cd read-the-docs

# 创建 python 虚拟环境
$ python3 -m venv v-env
# 激活 python 虚拟环境环境
$ source v-env/bin/activate
# 停用 python 虚拟环境使用以下命令
$ deactivate

# 安装Sphinx同时会安装很多python依赖,请耐心等待...
$ pip install sphinx sphinx-autobuild sphinx_rtd_theme

# 安装完成后,执行命令
$ sphinx-quickstart
欢迎使用 Sphinx 4.3.2 快速配置工具。

请输入接下来各项设置的值(如果方括号中指定了默认值,直接
按回车即可使用默认值)。

已选择根路径:.

有两种方式来设置 Sphinx 输出的创建目录:
一是在根路径下创建“_build”目录,二是在根路径下创建“source”
和“build”两个独立的目录。
> 独立的源文件和构建目录(y/n) [n]: y

项目名称将会出现在文档的许多地方。
> 项目名称: Leeks-Docs
> 作者名称: Leeks
> 项目发行版本 []: 0.0.1

如果用英语以外的语言编写文档,
你可以在此按语言代码选择语种。
Sphinx 会把内置文本翻译成相应语言的版本。

支持的语言代码列表见:
http://sphinx-doc.org/config.html#confval-language。
> 项目语种 [en]: zh_CN

创建文件 /Users/yushuai/workspace/tmp/read-the-docs/source/conf.py。
创建文件 /Users/yushuai/workspace/tmp/read-the-docs/source/index.rst。
创建文件 /Users/yushuai/workspace/tmp/read-the-docs/Makefile。
创建文件 /Users/yushuai/workspace/tmp/read-the-docs/make.bat。

完成:已创建初始目录结构。

你现在可以填写主文档文件 /Users/yushuai/workspace/tmp/read-the-docs/source/index.rst 并创建其他文档源文件了。 用 Makefile 构建文档,例如:
 make builder
此处的“builder”是支持的构建器名,比如 html、latex 或 linkcheck。

# 查看目录树结构
$ tree .
.
├── build
├── make.bat
├── Makefile
└── source
    ├── conf.py
    ├── index.rst
    ├── _static
    └── _templates
更改主题 sphinx_rtd_theme
$ vim source/conf.py
# 在文件中加入一下信息
import sphinx_rtd_theme
html_theme = "sphinx_rtd_theme"
html_theme_path = [sphinx_rtd_theme.get_html_theme_path()]
执行
make html,进入build/html目录后用浏览器打开index.html预览效果$ make html 正在运行 Sphinx v4.3.2 正在加载翻译 [zh_CN]... 完成 创建输出目录... 完成 构建 [mo]: 0 个 po 文件的目标文件已过期 构建 [html]: 1 个源文件的目标文件已过期 更新环境: [新配置] 已添加 1,0 已更改,0 已移除 阅读源... [100%] index 查找当前已过期的文件... 没有找到 pickling环境... 完成 检查一致性... 完成 准备文件... 完成 写入输出... [100%] index 正在生成索引... genindex 完成 正在写入附加页面... search 完成 copying static files... 完成 正在复制额外文件... 完成 正在导出 Chinese (code: zh) 的搜索索引... 完成 正在导出对象清单... 完成 构建 成功. HTML 页面保存在 build/html 目录。
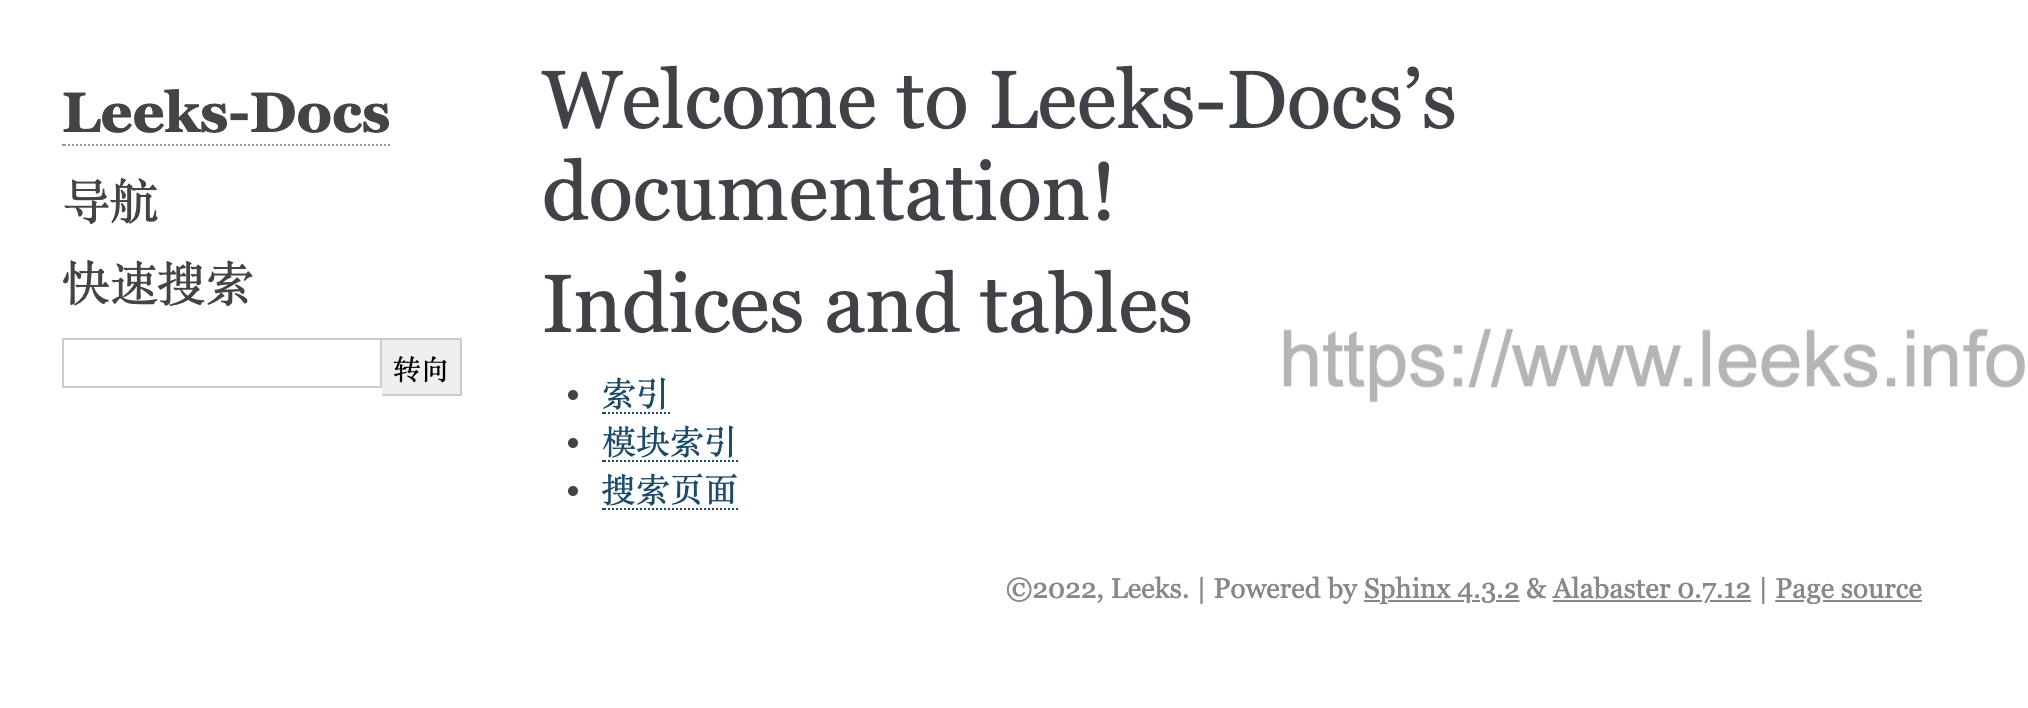
修改前页面样式,如图所示:
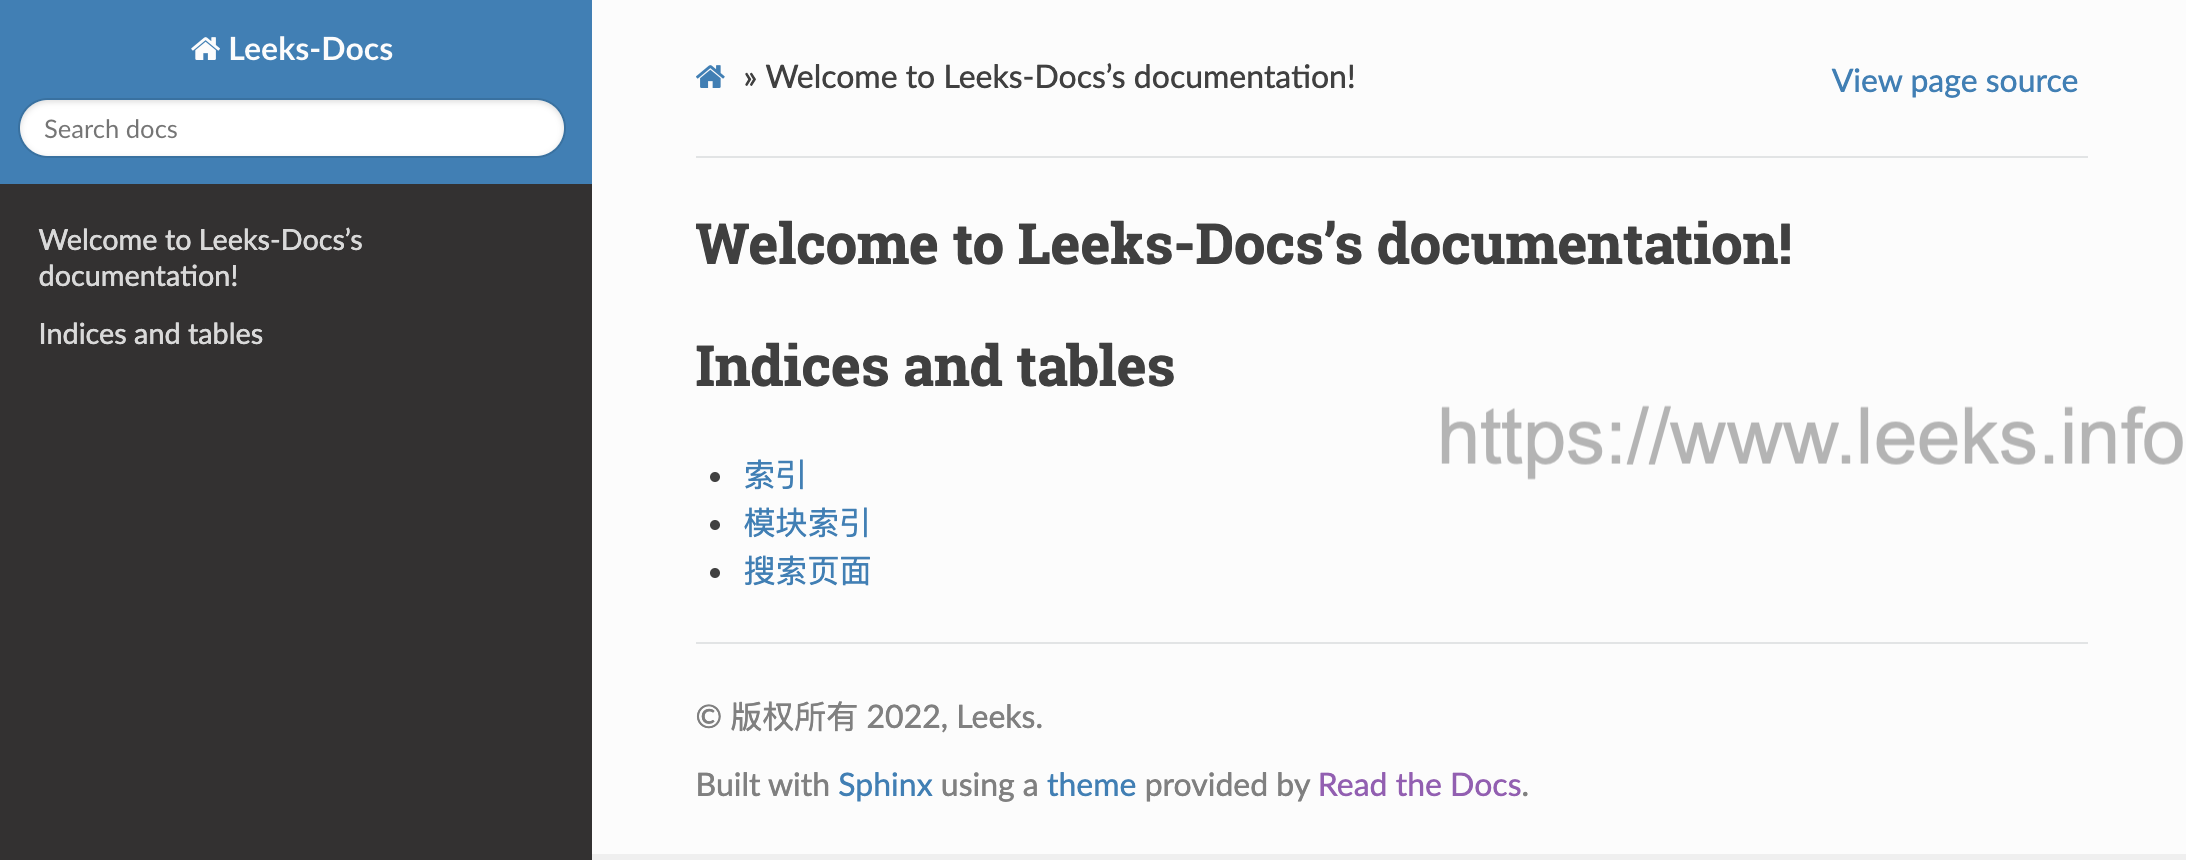
修改后页面的样式,如图所示:
支持markdown编写
通过recommonmark 来支持markdown
$ pip install recommonmark
参考配置文件
我的配置文件内容
$ vim source/conf.py

import sys
import os
import shlex
import sphinx_rtd_theme
import recommonmark
from recommonmark.parser import CommonMarkParser
from recommonmark.transform import AutoStructify

# 如果扩展(或使用 autodoc 记录的模块)在另一个目录中,请在此处将这些目录添加到 sys.path。 如果目录相对于文档根目录,请使用 os.path.abspath 使其成为绝对路径,如此处所示。
sys.path.insert(0, os.path.abspath('..'))
source_suffix = ['.rst', '.md']

project = 'Documentation'
copyright = '2022, TenderLeeks'
author = 'TenderLeeks'
release = '0.0.1'

extensions = [
    'sphinx.ext.autodoc',
    'sphinx.ext.napoleon',
    'sphinx.ext.mathjax',
    'recommonmark',
]

master_doc = 'index'
templates_path = ['_templates']
version = recommonmark.__version__
language = 'zh_CN'
exclude_patterns = ['_build']
default_role = None
pygments_style = 'sphinx'
todo_include_todos = False
html_theme = "sphinx_rtd_theme"
html_theme_path = [sphinx_rtd_theme.get_html_theme_path()]
html_static_path = ['_static']
htmlhelp_basename = 'Recommonmarkdoc'

latex_elements = {
}

latex_documents = [
  (master_doc, 'Recommonmark.tex', u'Recommonmark Documentation',
   u'Lu Zero, Eric Holscher, and contributors', 'manual'),
]

man_pages = [
    (master_doc, 'recommonmark', u'Recommonmark Documentation',
     [author], 1)
]

texinfo_documents = [
  (master_doc, 'Recommonmark', u'Recommonmark Documentation',
   author, 'Recommonmark', 'One line description of project.',
   'Miscellaneous'),
]

def setup(app):
    app.add_config_value('recommonmark_config', {
        'auto_toc_tree_section': 'Contents',
        'enable_math': False,
        'enable_inline_math': False,
        'enable_eval_rst': True,
        'enable_auto_doc_ref': True,
    }, True)
    app.add_transform(AutoStructify)
GitHub托管
一般的做法是将文档托管到版本控制系统比如github上面,push源码后自动构建发布到readthedoc上面, 这样既有版本控制好处,又能自动发布到readthedoc,实在是太方便了。
首先在GitHub创建一个公有仓库名字叫 leeks-docs, 然后在本地添加 .gitignore 文件,文件内容如下:
$ vim .gitignore

build/
venv/
.idea/
source/.DS_Store
.DS_Store
具体几个步骤非常简单,参考官方文档
在Read the Docs上面注册一个账号,可以直接使用github账号进行登录使用。
登陆后点击 Import
给该文档项目填写一个名字比如
leeks-docs, 并添加你在GitHub上面的工程HTTPS链接, 选择仓库类型为Git。其他项目根据自己的需要填写后点击
Create,创建完后会自动去激活Webhooks,不用再去GitHub设置。完成之后,从此只要你往这个仓库push代码,readthedoc上面的文档就会自动更新。
注:在创建 read the docs 项目时候,语言选择
Simplified Chinese
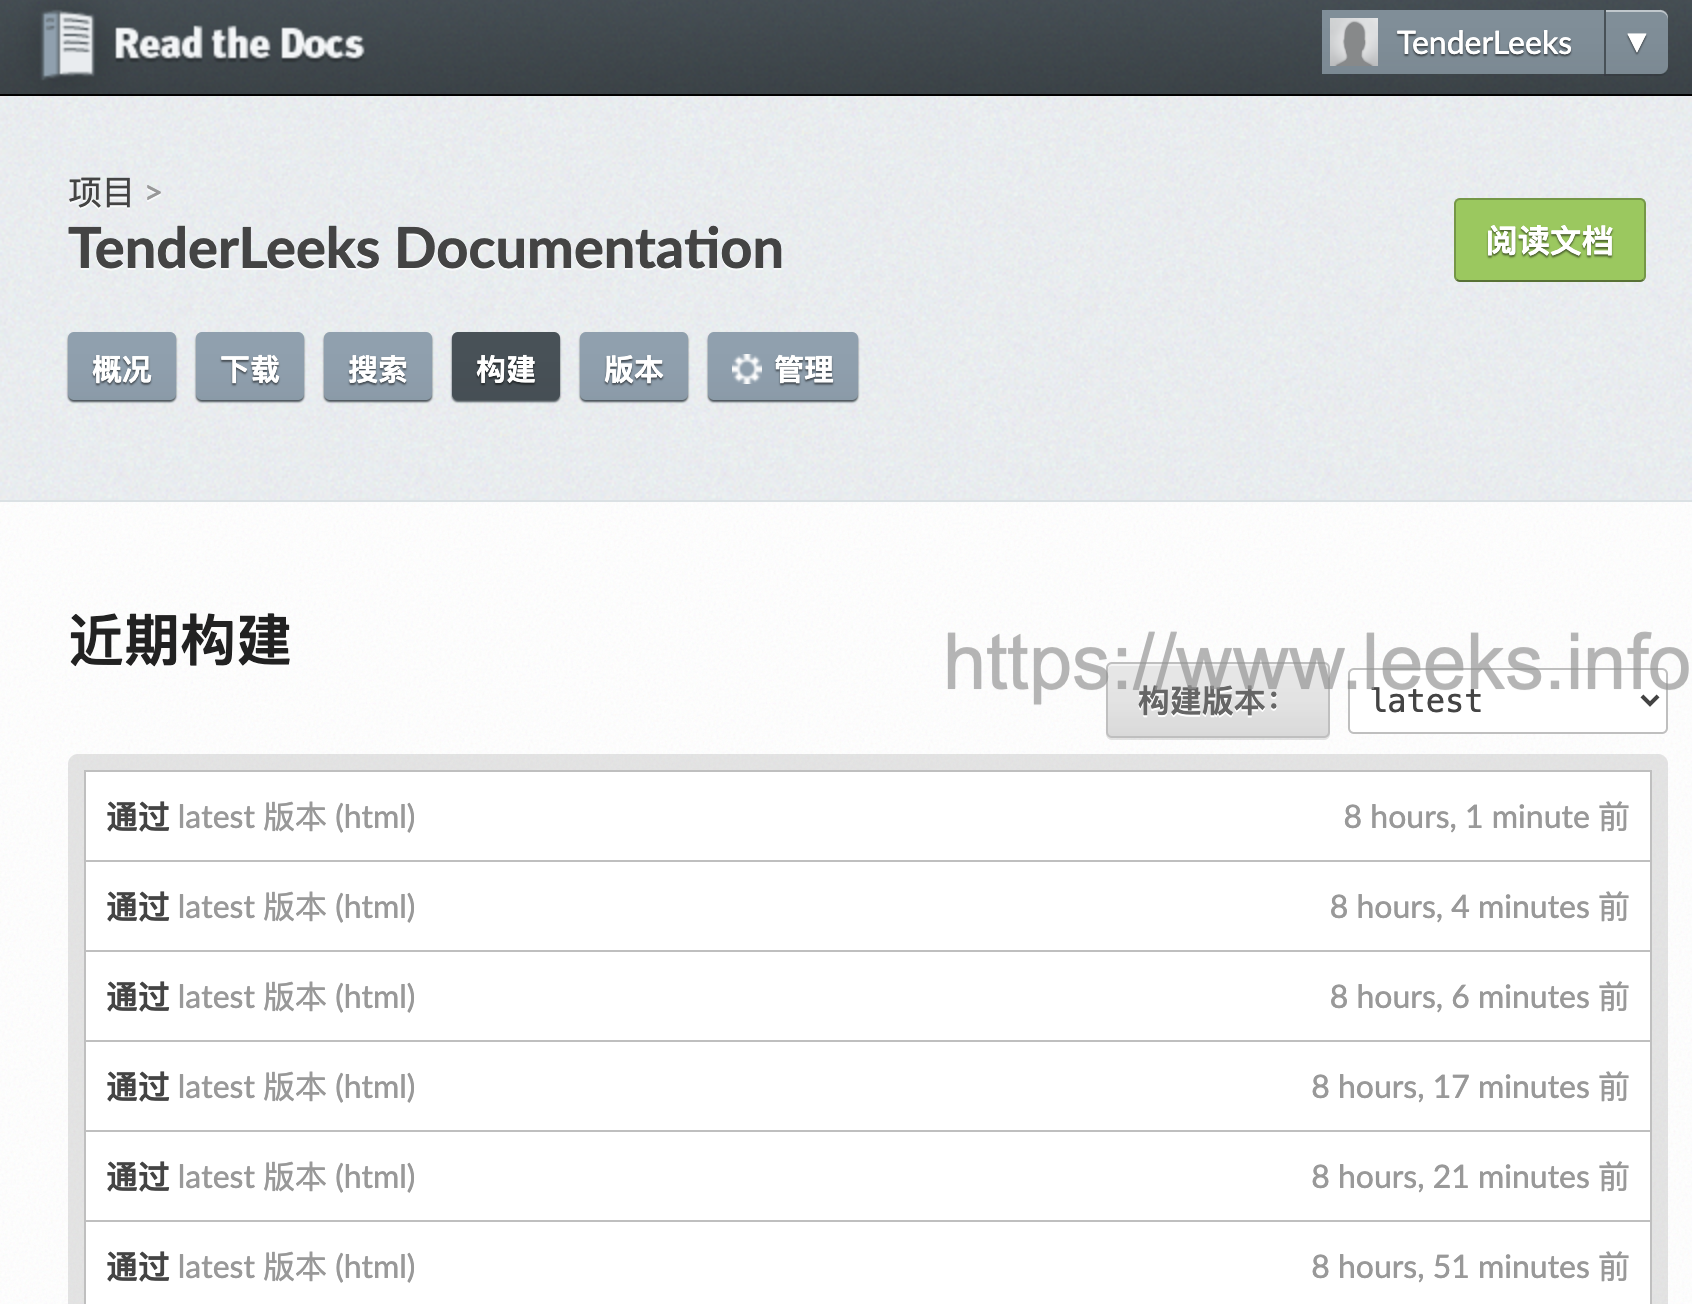
在构建过程中出现任何问题,都可以登录readthedoc找到项目中的 构建 页查看构建历史,点击任何一条查看详细日志:
index.rst 文件编写规则
rst上手难度远高于markdown, 功能扩展完爆markdown
以下是 index.rst 文件的简单内容,请参考:
$ vim source/index.rst
.. Documentation documentation master file, created by
   sphinx-quickstart on Fri Jan  7 20:45:52 2022.
   You can adapt this file completely to your liking, but it should at least
   contain the root `toctree` directive.

欢迎使用 Leeks 的文档!
=========================================

.. toctree::

   搭建ReadtheDocs托管文档 <introduction/搭建ReadtheDocs托管文档>


.. toctree::
   :maxdepth: 2

   运维工具 <ops_tools/index>
   其他栏目 <other/index>


.. toctree::
   :caption: EFK
   :maxdepth: 2

   EFK日志分析系统 <EFK/index>
$ vim source/EFK/index.rst
EFK日志分析系统
=====================================


.. toctree::
   :maxdepth: 2

   EFK日志管理系统 <EFK日志分析系统>
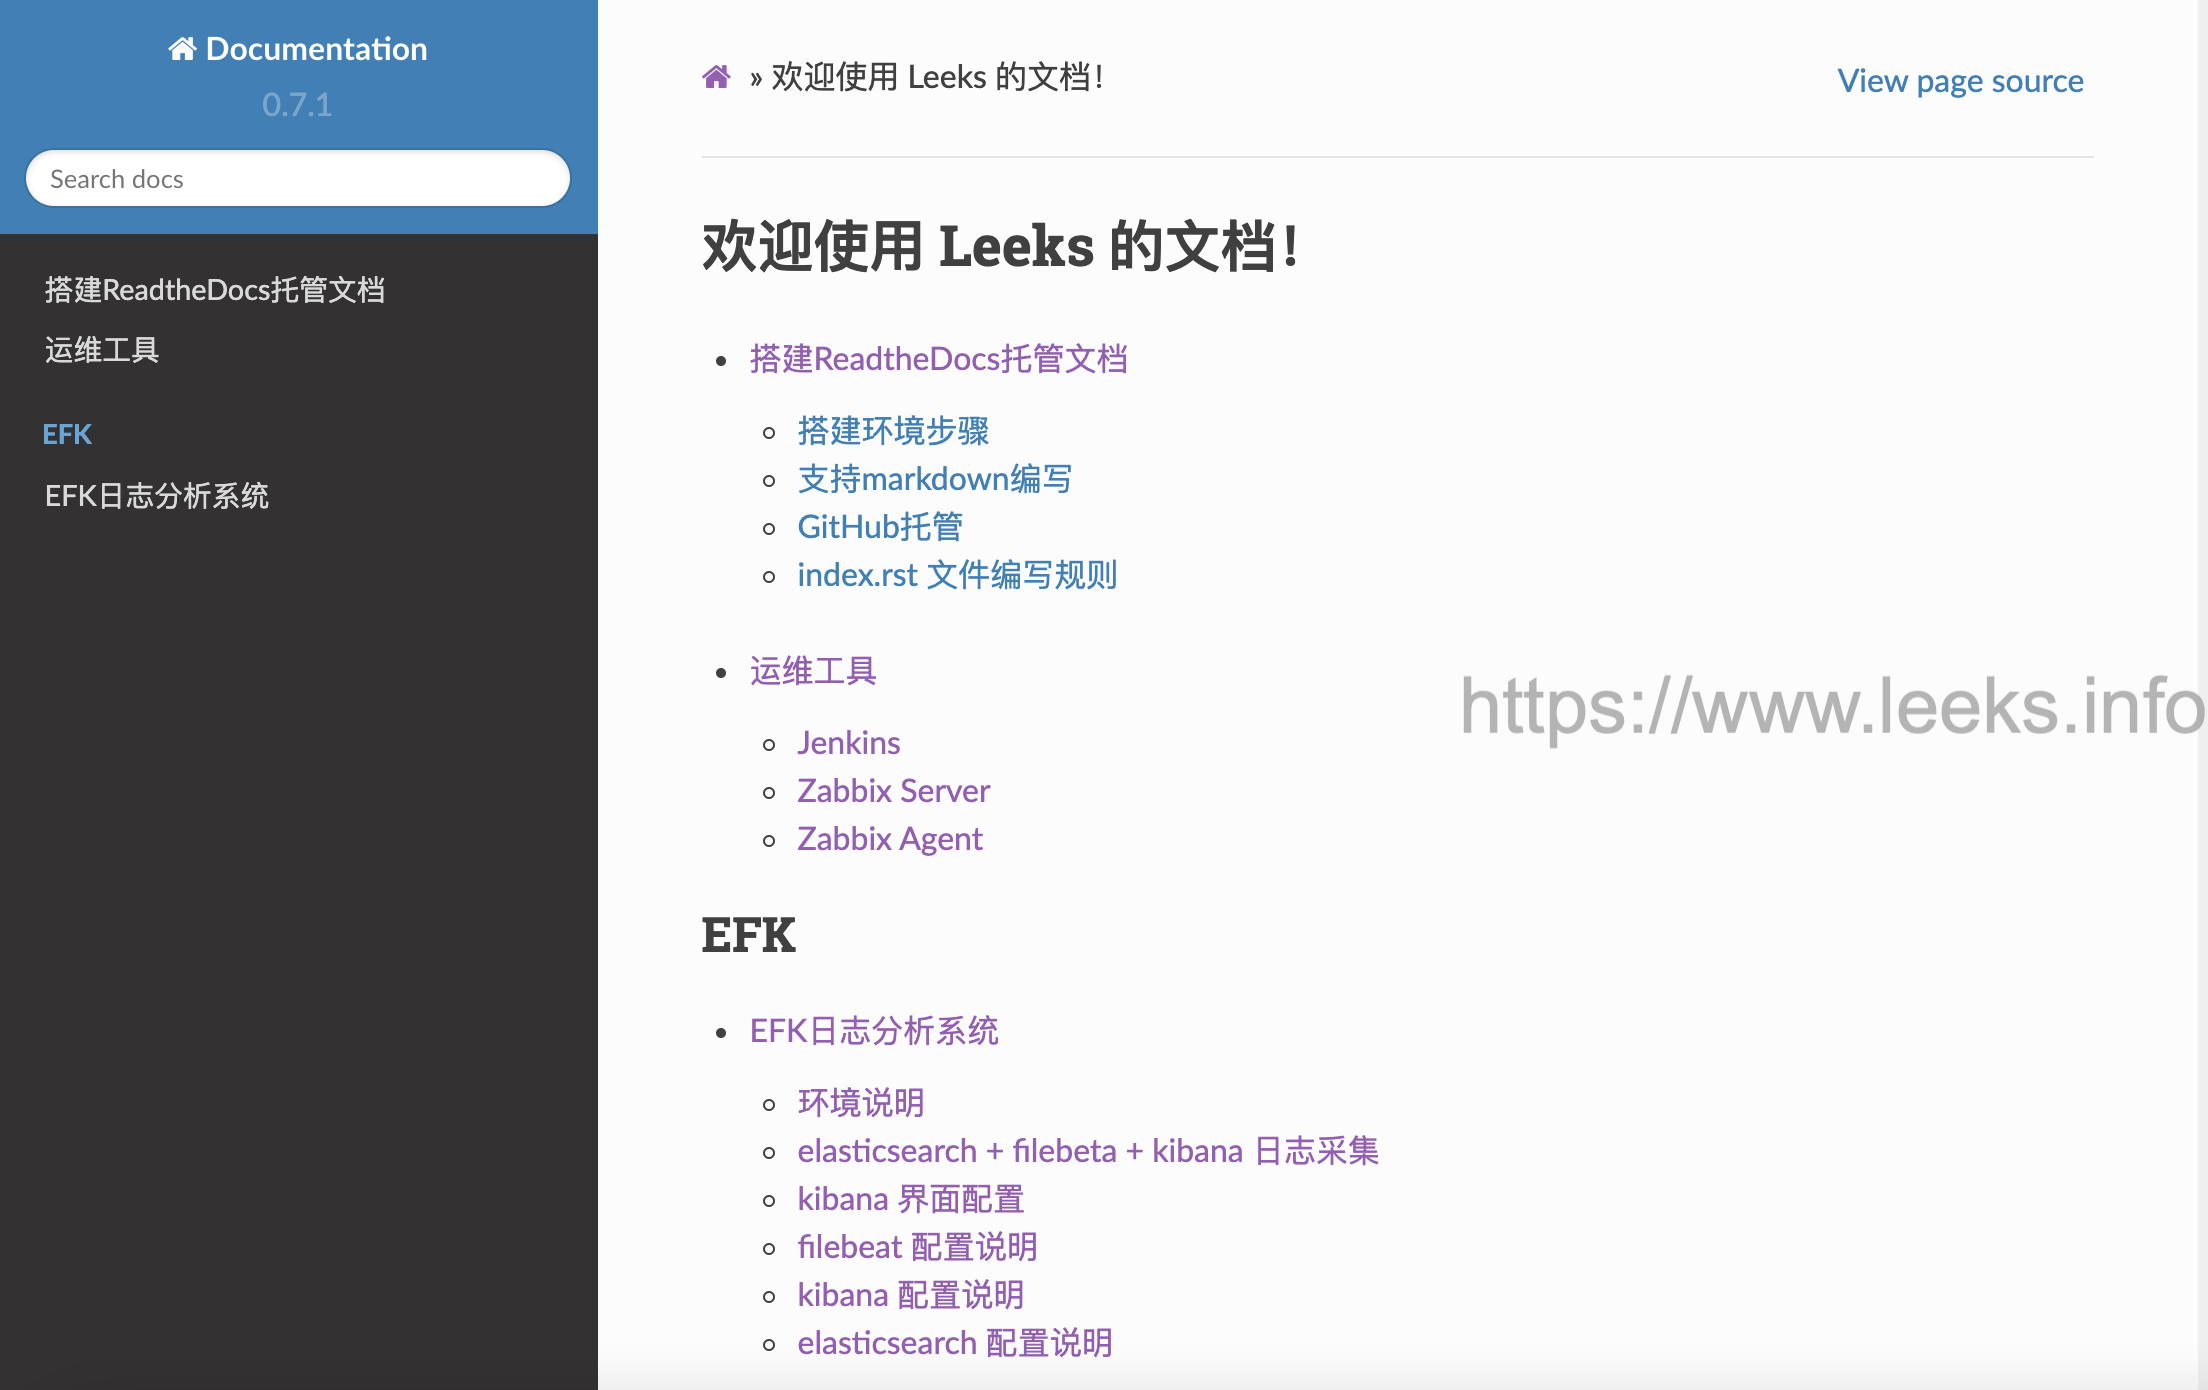
文件目录如图:

最终页面内容样式,如图所示:
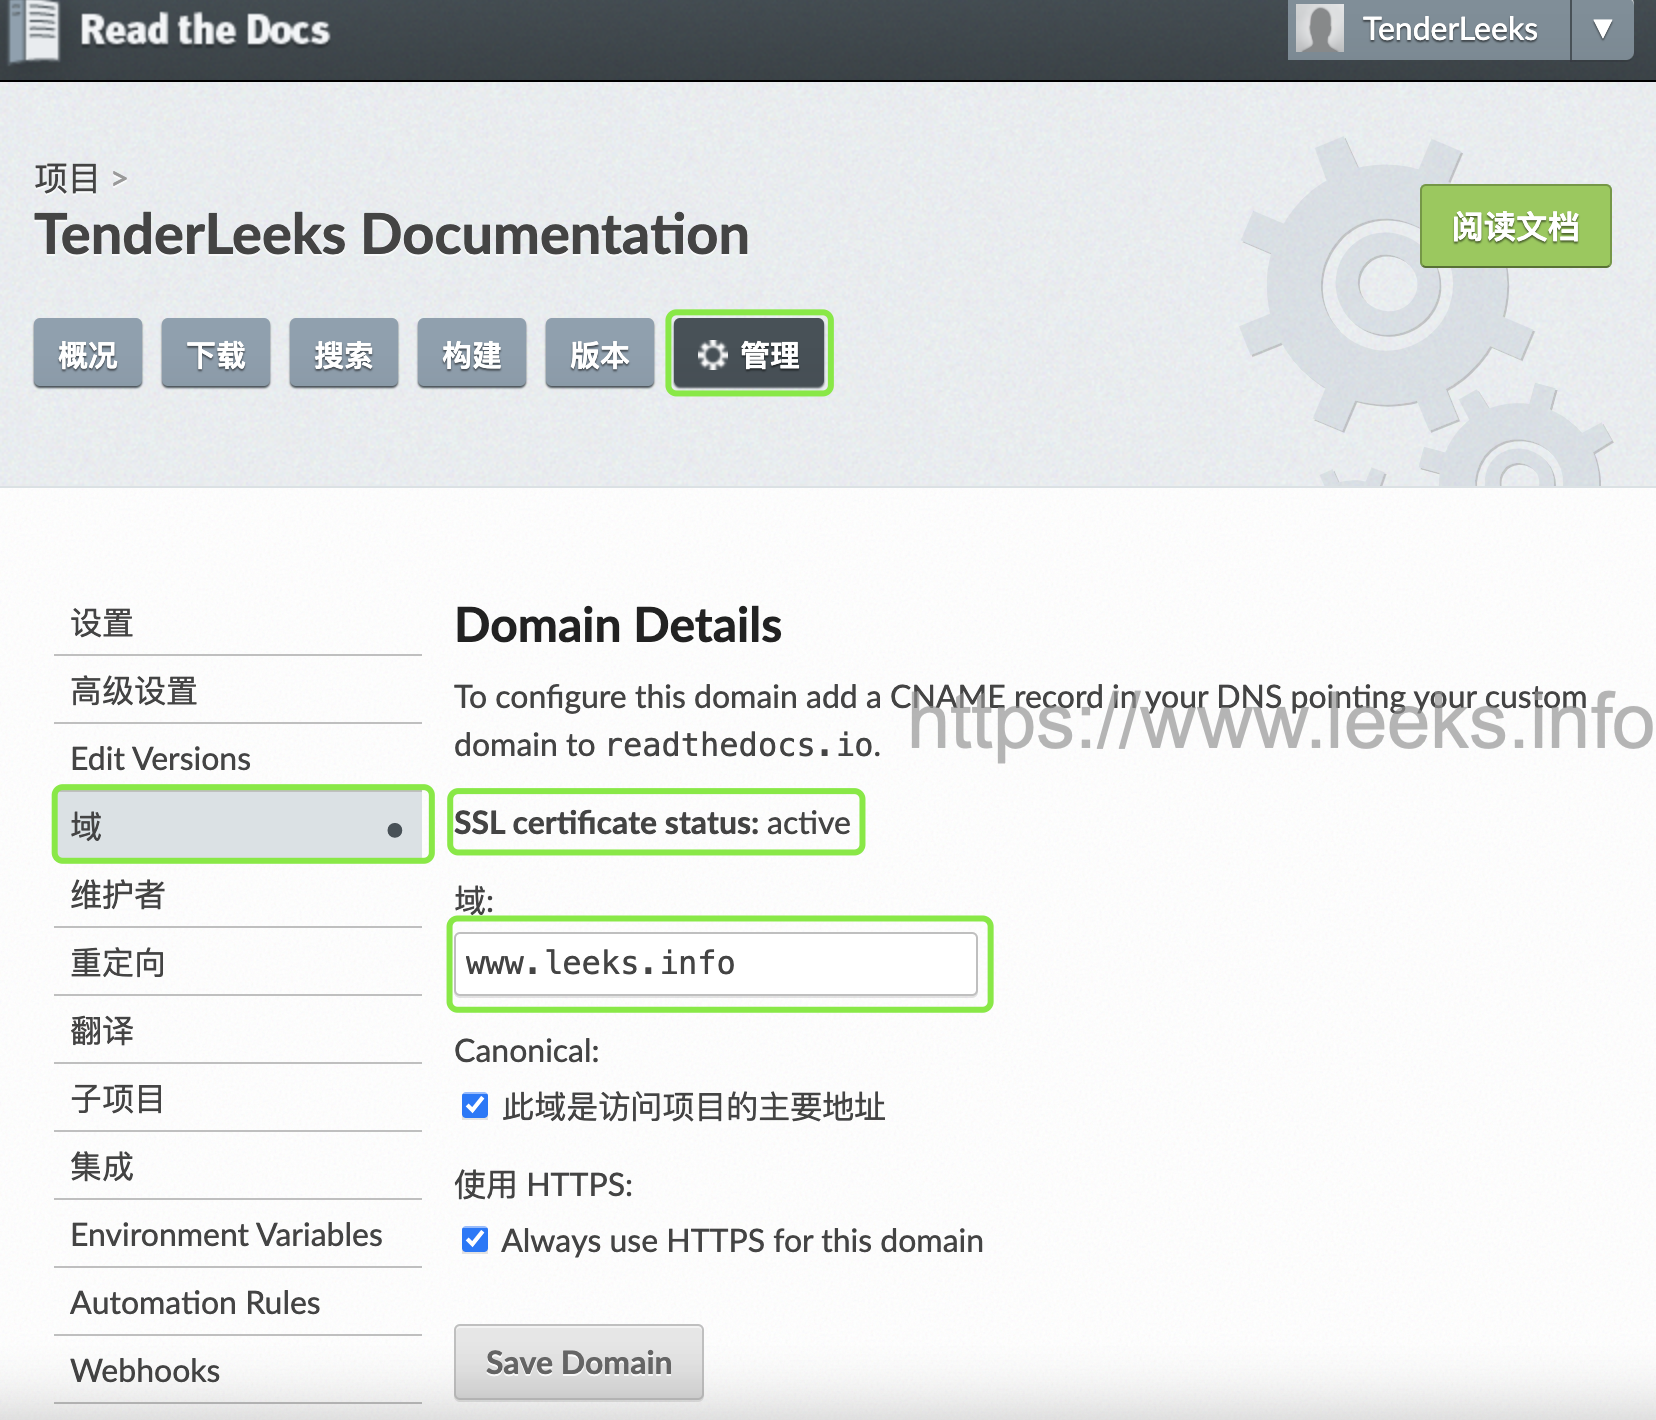
使用自定义域名
在godaddy购买一个域名,然后在 ReadtheDocs 页面管理中选择域,如图:
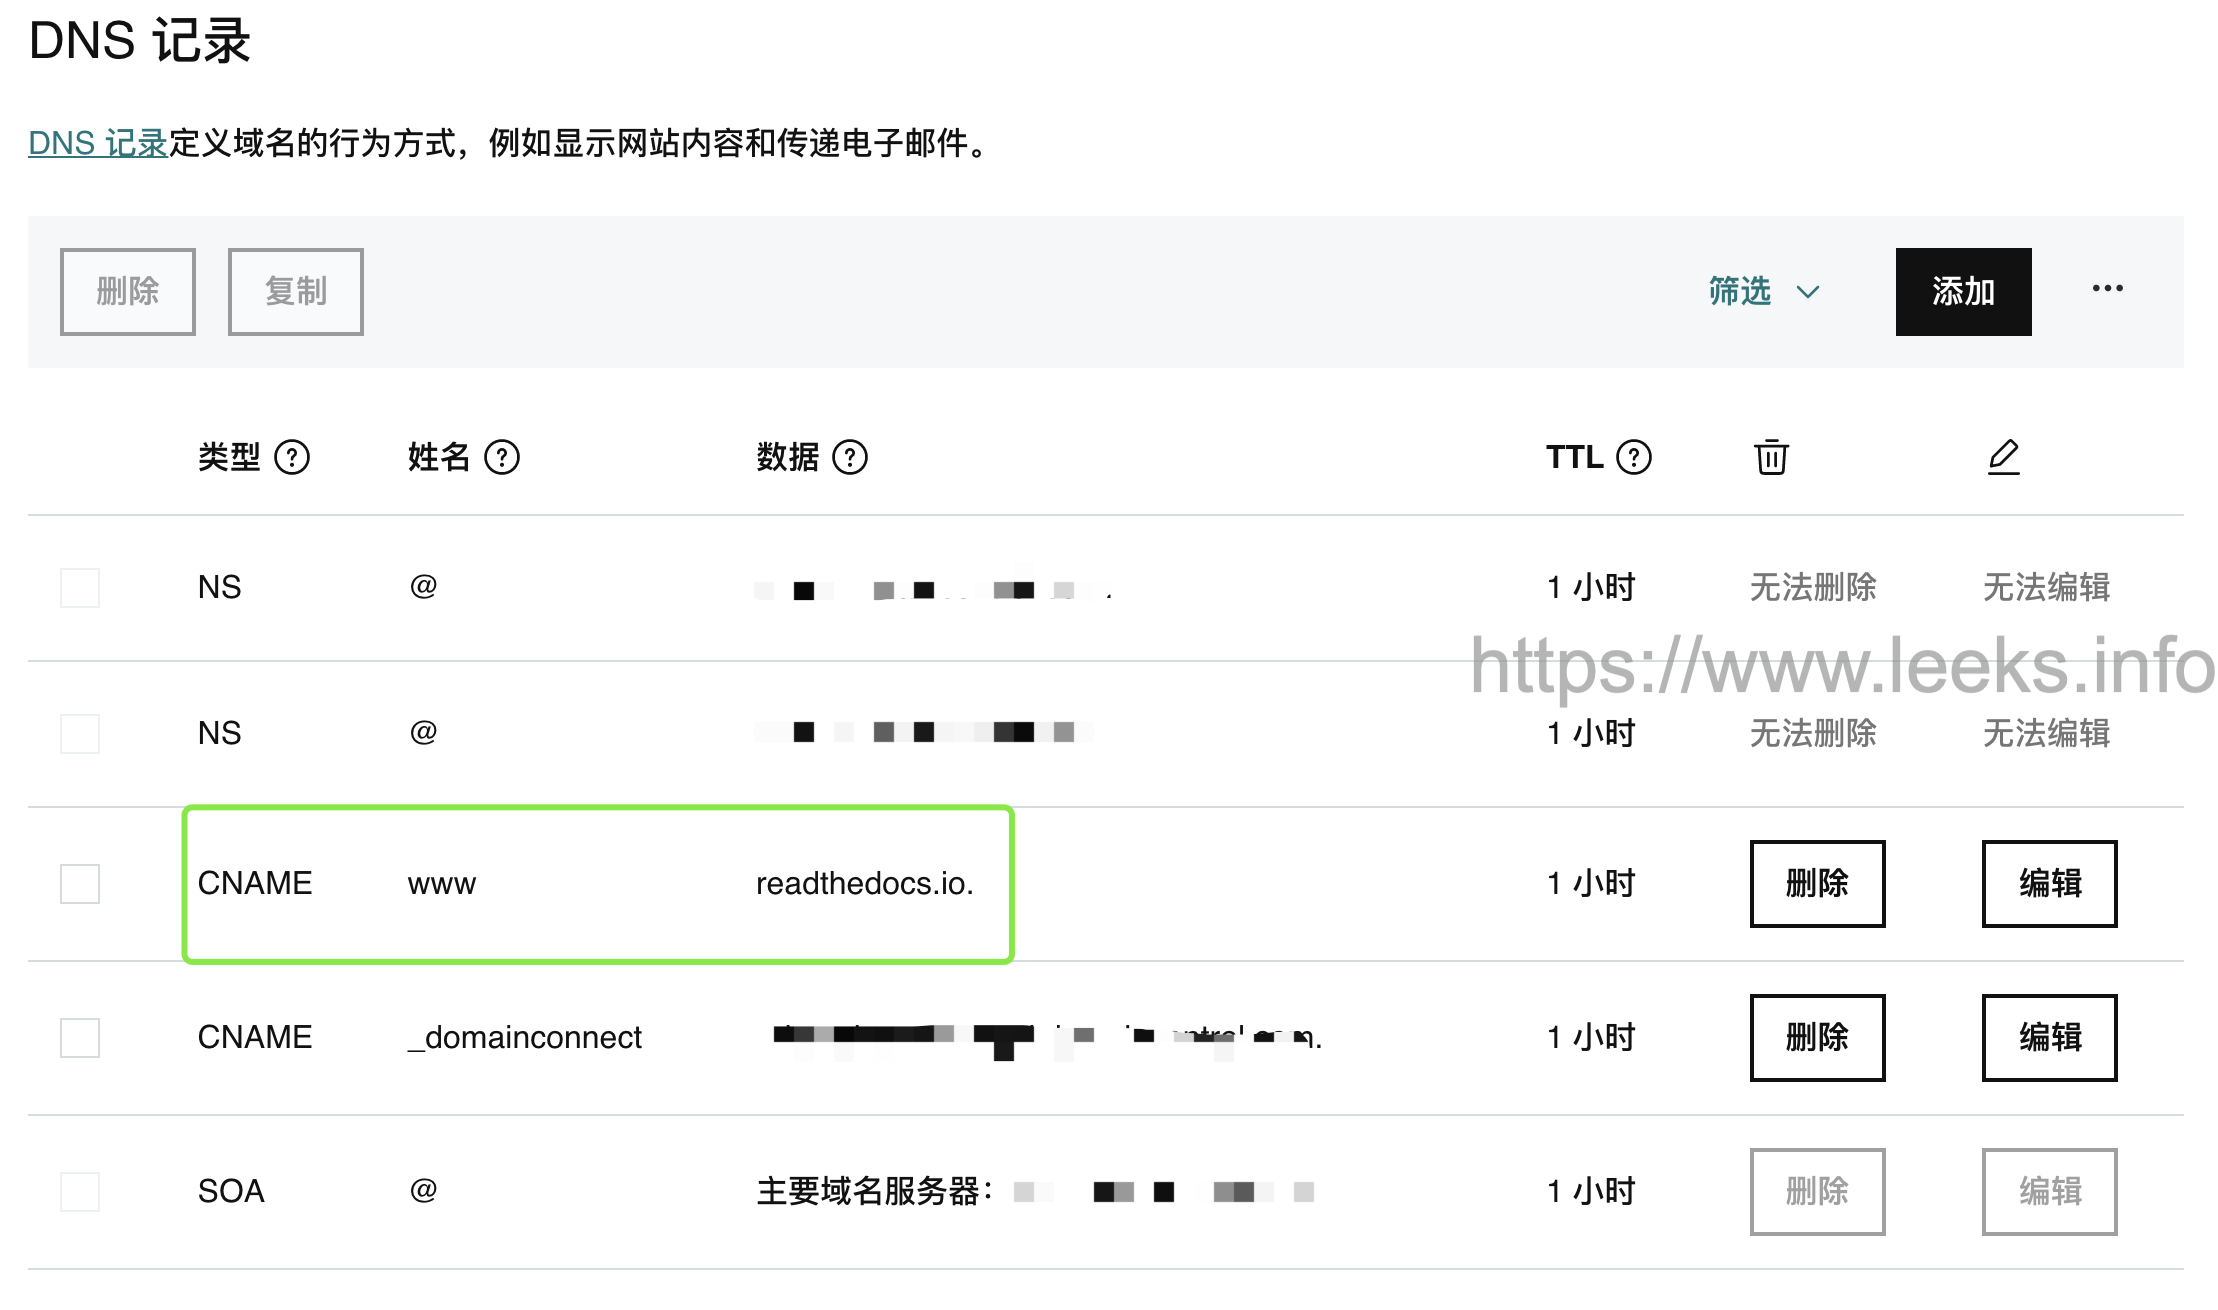
godaddy DNS 添加解析,如图所示:
参考文档:
https://ebf-contribute-guide.readthedocs.io/zh_CN/latest/markdown-syntax/markdown-sphinx.html